

Why Dust-Controlled Demolition Matters
Every hammer swing and pry bar pull can release fine particles from materials like drywall, plaster, insulation, wood, and masonry. Left unmanaged, these particles can degrade indoor air quality, create health risks, and turn a focused renovation into a whole-house cleanup job.
That’s why dust control is essential and built into everything we do. We come prepared with professional-grade containment systems, targeted cleanup protocols, and strategic airflow management. Our approach minimizes dust migration and protects the integrity of your home. With the right equipment, planning, and precision, we ensure your demolition stays clean, safe, and on schedule.
What Makes Demolition Dust So Dangerous?
At first glance, demolition dust might seem like a harmless byproduct of progress; a little extra sweeping at the end of the day. But in reality, it is far more insidious. This dust is not simply dirt in the air. It is a fine, often invisible mixture of particles that can seriously threaten your health and home if not properly contained and managed.
Health Hazards You Cannot Afford to Ignore
Every material removed during demolition can potentially release microscopic particles into the air. These particles may be small, but the damage they can cause is significant.
- Silica dust, for example, is released when you cut, grind, or chip materials like concrete, mortar, brick, and stone. Over time, inhaling these fine particles can lead to silicosis, a debilitating and irreversible lung disease. Limited exposure, especially in enclosed spaces, risks workers and residents.
- Gypsum dust, commonly produced when tearing out drywall, is a significant irritant. It can worsen asthma, trigger allergies, and linger in the air longer than you might expect. What seems like a light powder can quickly overwhelm a space and make breathing uncomfortable, especially for children or those with respiratory conditions.
- Lead and asbestos still lurk in many older homes. If disturbed during demolition, these substances become airborne hazards. Lead dust is hazardous to children, while asbestos exposure has been directly linked to long-term health issues, including cancer. Handling these materials without proper containment and filtration can result in serious health consequences and expensive remediation efforts.
Demolition dust is not just an unpleasant nuisance: it’s a manageable risk that can be effectively controlled with the proper precautions.
The Hidden Toll on Your Home
Even if the health risks are not immediately obvious, the impact of unchecked dust on your home is difficult to miss. Once it escapes the demolition area, dust has a way of making itself at home where it does not belong.
- It settles into carpets and rugs, embedding deep into the fibers where vacuums often cannot reach.
- It infiltrates electronics, shortening the life span of appliances, TVs, computers, and HVAC components.
- It coats surfaces from countertops to baseboards to windowsills with a fine film that dulls finishes, scratches delicate materials, and requires extensive cleaning to remove.
Worse still, if it gets into your heating and cooling system, that same dust can circulate for weeks or even months after the demolition, coating vents, clogging filters, and reducing air quality throughout your home.
How Dust Travels: Understanding the Pathways
Whether planning a small interior demo or a complete gut renovation, the dust generated is something you can’t afford to underestimate. One of the most frustrating things is how effortlessly dust spreads. You might think it will stay contained to the room you’re working in, but without proper precautions, dust has a way of migrating into every corner of your home, often unexpectedly.
Open Spaces and Shared Living Areas
Homes are designed to flow; open-concept layouts, connected hallways, stairwells, and doorways all create natural pathways for air and, unfortunately, dust. Even the slightest vibration or movement during demolition can send fine particles drifting from the work zone into nearby bedrooms, kitchens, or living areas.
What starts in a single room quickly becomes a house-wide concern if those entry points are not sealed off properly. Sealing off the work area is crucial to prevent the spread of dust, as it limits the pathways through which dust can travel, reducing the risk of contamination in other parts of the house.
If you are renovating in an active household, it is even more critical. Children, pets, or family members can unknowingly track dust into clean areas by walking through adjacent rooms. The more foot traffic nearby, the greater the chance of spreading contamination.
HVAC Systems: Dust Highways in Disguise
Your heating and cooling system is designed to circulate air throughout the home, but that circulation becomes a liability during demolition. Air returns near the renovation zone will pull in contaminated air and distribute it through ductwork into every room connected to the system. Once inside the HVAC system, dust clings to vents, filters, and coils, which can continue recirculating long after the work is finished.
Even with the system turned off, passive airflow through vents can still carry particles. Sealing vents and returns before starting any interior demolition is essential.
Air Pressure and the Invisible Push
You do not have to see dust moving to know it is happening. Something as simple as opening or closing a door creates subtle shifts in air pressure that can force dust-laden air out of the work zone and into cleaner areas. These invisible drafts pull contaminants under door frames, through window gaps, or along baseboards.
Add power tools, fans, or even the natural convection of warm and cool air, and you have a recipe for rapid dust migration. If the space is not adequately sealed and pressurized, you may find yourself battling dust in places that were never part of the renovation.
At Local Demo, we aim to prevent the spread in the first place.
Dust Control: Key Preparation Steps Before Demolition Begins
Dust control requires careful planning, the right tools, and clear communication with everyone involved. The more thorough the preparation, the cleaner and safer your home will remain throughout the renovation.
1) Map Out Risk Zones
Local Demo starts with a complete walkthrough of the area where demolition occurs. We identify the direct work zone and any nearby spaces at risk of dust exposure, such as hallways, staircases, adjacent rooms, shared living areas, and utility closets. We also note open doorways, vents, windows, and built-in cabinetry that could trap or collect dust.
2) Identify High-Risk Materials Before Disturbing Them
Not all dust is created equal. We determine what we work with before removing drywall, flooring, or ceiling materials. Homes built before the 1980s may contain asbestos in insulation or ceiling textures. Older paint could have lead, concrete, tile, and mortar that release silica dust when broken or cut.
Knowing what materials will be disturbed allows us to plan for additional safety measures such as proper ventilation, protective gear, or even abatement.
3) Shut Down or Isolate the HVAC System
One of the quickest ways for dust to spread is through your home’s HVAC system. Dust that enters an air return can be blown through ducts into every room in your house, leaving behind a fine layer of contamination that is tough to remove.
That’s why, before demolition begins, we shut down the HVAC system in affected zones and seal off vents and returns in the work area using magnetic covers, plastic sheeting, and painter’s tape. If the system needs to stay on for temperature control in other house areas, we may install high-efficiency filters and change them frequently during the project.
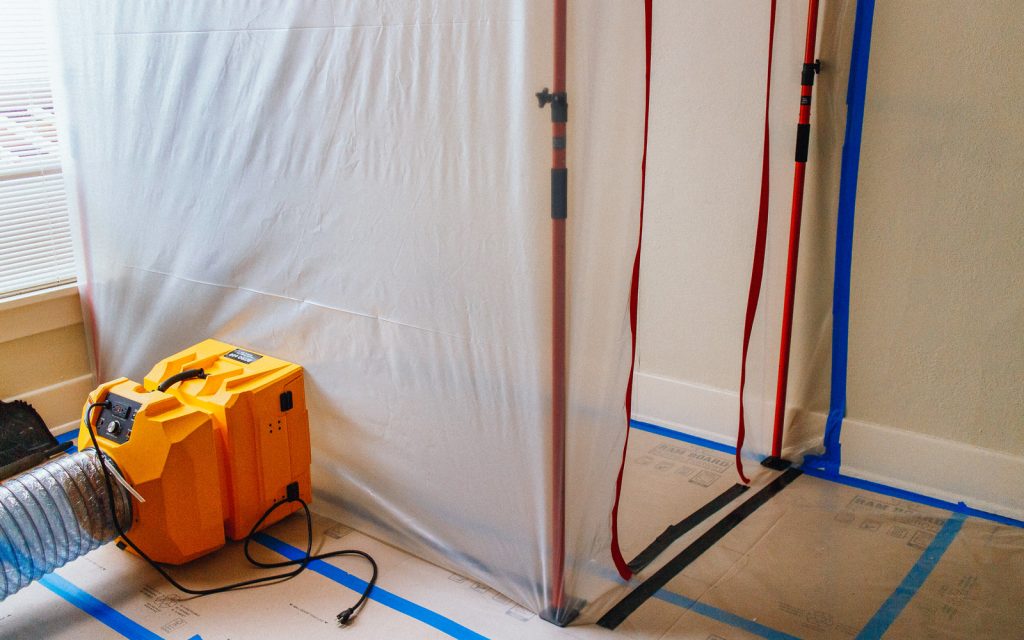
Containment Strategies for Dust Control
The key to controlling dust is containment: physical separation between the work zone and the living space. To effectively trap dust where it starts, you need the right barriers installed with attention to detail.
1) Zipper Walls and Temporary Barriers
Zipper walls are one of the most versatile and effective ways to contain a demolition area. They are made by attaching heavy-duty plastic sheeting to create a temporary fence, then cutting and sealing in a vertical zipper for access. We use them to block off doorways, hallways, staircases, or any opening that connects the demolition zone to the rest of the home.
2) Doorway and Window Seals
Even if full containment walls are not installed, sealing door and window frames is necessary. Dust can slip through the most minor gaps and travel far beyond the renovation area. Foam weatherstripping, painter’s tape, and magnetic vent covers can make a big difference.
A layered solution works best for doors you must pass through frequently: a plastic curtain on one side and a sealed zipper panel on the other. If a window opens into the work zone, it should be sealed shut for the project’s duration or used strategically to exhaust filtered air from the room.
3) Floor-to-Ceiling Barriers
Partial barriers may look like they are doing the job, but dust surrounds them. That is why containment requires full coverage from floor to ceiling and wall to wall. We use thick plastic sheeting, reinforced with framing, or specialized containment materials for construction environments. Weight is added to the bottom edge, or double-sided tape is used to secure it tightly to the floor. If there is a gap, there is a leak. And if there is a leak, the dust will escape.
In-Action Dust Suppression Tactics
Containment traps dust, but suppression keeps it from becoming airborne. The more dust you can control at the source, the less you must clean later. During demolition, we may use a combination of tools and techniques to limit the amount of dust released into the air.
1) Water-Based Control
Water is one of the simplest and most effective tools for reducing airborne dust. When applied correctly, it can prevent dust from ever lifting off the surface. Handheld, pump, or low-pressure misters dampen materials before cutting or removing them lightly. This is especially important when working with drywall, tile, plaster, or concrete. The key is to mist, not soak. Too much water creates problems: slippery floors, soggy debris, and potential water damage to materials you plan to keep.
2) Vacuum-Assisted Power Tools
Power tools create more dust than any other part of demolition. If you don’t capture it at the source, it will fill the room fast. Saws, grinders, and sanders that include built-in vacuum ports connect to a dust extractor or a high-powered vacuum equipped with a HEPA filter. This setup captures particles immediately before they can spread. HEPA-compatible systems are designed to trap microscopic particles, including silica, drywall dust, and other potentially hazardous debris. Not only is this a cleaner way to work, but it is also safer.
3) Negative Air Pressure
Setting up negative air pressure in the containment area can make a big difference for larger or longer renovation projects, especially those involving older homes or hazardous materials. This system uses an exhaust fan to pull air from the demolition zone and vent it outside through a window or temporary duct. Creating a vacuum effect ensures that air (and dust) is constantly flowing into the work zone, not out of it.
To be effective, the fan must be paired with a HEPA filtration system to prevent particles from being released into the surrounding environment. This professional-level strategy is often worth the investment for home projects where dust control is a top priority.
Post-Demolition Cleanup
Once the dust settles, we roll our sleeves and restore the space to a safe, usable condition. Skipping or rushing through this step is a costly mistake. Fine particles left behind can continue circulating through the air, damage finishes, and compromise the quality of the following work. A thorough post-demolition cleanup is about more than appearance. It’s also about safety, air quality, and protecting your investment.
HVAC Filter Changes and Duct Considerations
Your HVAC system works hard to circulate air throughout your home, but if not appropriately addressed, it may also circulate dust during a renovation. Even if vents were sealed during the project, some particles may still have found their way inside. After the demolition phase is complete:
- Replace all filters in your heating and cooling system. Opt for high-efficiency or HEPA-rated filters to capture lingering airborne debris and prevent redistribution throughout your home.
- Inspect air returns and supply vents for visible buildup. Use a vacuum with a brush attachment to gently clean the grilles and surrounding areas.
- Consider a professional duct cleaning if your home is older or you notice a musty smell, visible dust in vents, or reduced airflow. Dust that settles inside ductwork can remain hidden, affecting indoor air quality long after cleanup.
This step is crucial in homes with pets, children, older adults, or anyone sensitive to air quality. A clean system will help maintain a healthier environment as the renovation continues.
Safe Disposal of Dusty Debris
All that dust and debris must go somewhere, and tossing it in your regular trash bin is rarely the best option. Construction debris, especially if it contains hazardous materials, requires careful handling and disposal.
- Collect dust, insulation, drywall fragments, and other fine particles using thick, heavy-duty contractor bags. Double-bag when necessary and seal each bag tightly before moving it.
- Label hazardous materials clearly if your demolition involves lead paint, asbestos, or other regulated substances. These materials may require special disposal sites or permits depending on local laws.
- Transport and dispose of debris at an approved construction waste facility. Many areas have designated drop-off locations for renovation waste, and some offer pickup services for larger loads. Always check local guidelines to ensure compliance.
Post-demolition cleanup sets the stage for smooth progress into the next renovation phase, keeps your household safe, and reflects the kind of care and professionalism that separates a quick job from a well-executed one.
Why Your Home Renovation Project Needs Local Demo
Whether remodeling a single room or preparing for a full-scale interior renovation, Local Demo ensures the demolition phase is clean, safe, and done right. We bring expert planning, advanced containment solutions, and precision cleanup protocols to every project. Contact us today for a consultation and experience the difference expertly controlled demolition makes.
Get In Touch
Our Location
125 Central Avenue, Unit J Bozeman, MT 59718
Call Us
Phone: (406) 595-0227
E-mail Us
jscauzzo@jobsitesolutionsmt.com
Our Service Area
We Service the Following Counties